Simul Blog
4 Ways to diff Microsoft Word Documents
Whether you’re collaborating with your team on a Microsoft Word Document or you’ve ended up with two versions of your own work, you are now trying to find the best way to compare these two documents in a swift and easy manner.
Luckily, there are 4 different ways that you can compare Microsoft Word Documents. Each coming with some pretty huge positives and negatives, some are better suited to the individual and others to large businesses.
In this post, we will breakdown each option and leave you well equipt to decide which best suits your task or team.
1. Use a dedicated collaboration tool
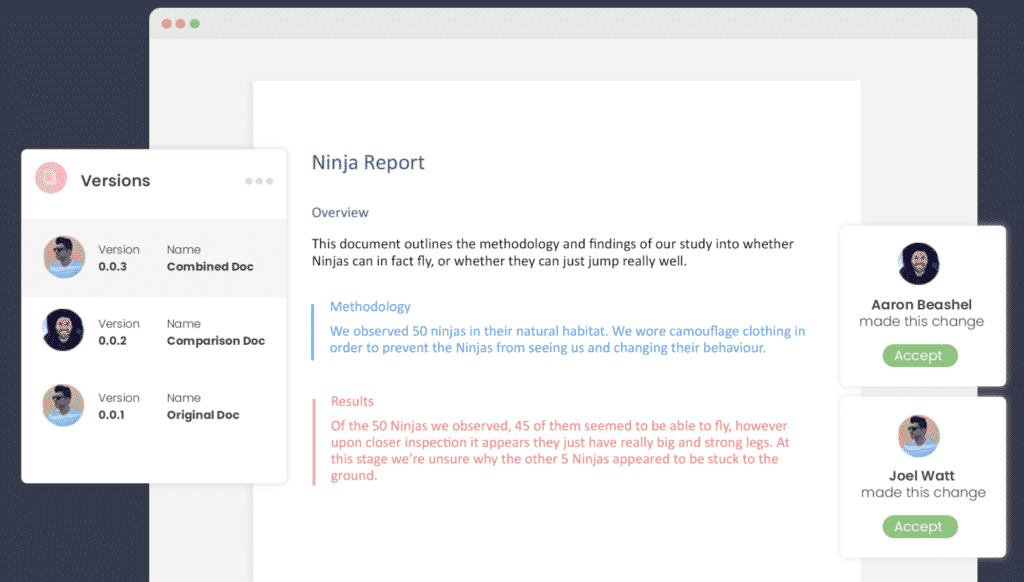
With so many of us facing the same issues when trying to compare Microsoft Word Documents, dedicated collaboration tools such as Simul Docs were built with collaboration in mind.
With Simul, you can easily compare two documents. Upload the documents from your computer or from cloud storage services like Sharepoint, OneDrive, Dropbox, Box or Google Drive.
Simul will then highlight the differences between the documents, allowing you to accept or reject each change.
Once you have reviewed the documents, simple press ‘Merge’ and the two documents seamlessly become one new version.
The only downside in using a collaboration tool is the additional cost. Most tools charge a fee per month or per user and while often a small fee, this may not fit within all companies budgets.
On the plus side, these tools make collaborating and comparing Microsoft Documents as simple as a click of a button. They not only save you time but provide solutions to other common problems such as version control and collaboration. Simul Docs also allows you to share and compare documents with people outside of your company with ease.
2. Use a dedicated compare tool
Many professionals require a dedicated tool to compare word documents. Tools such as Workshare and ComparePro are tools that allow you to compare two or more Word Documents and more.
Workshare, for example, offers you the ability to compare two Powerpoint presentations, excel documents and PDF files. Workshare also has other functionality that comes as a part of your subscription, such as Metadata, a metadata management solution and more.
Similar to the dedicated collaboration tools such as Simul Docs, compare tools make comparing work documents easy and were built with this issue in mind.
The main difference between two two is the price and the additional functions, Workshare provides security functions while Simul provides a full set of functions that assist you with seamless collaboration.

The Con of a comparison tool such as Workshare or ComparePro is the price. They offer subscriptions per user, not per document so you pay the full $300/annum to access the tool. This doesn’t provide much value for the occasional user.
Did we mention that the $300/annum only gives you access to the compare function as well, you pay for each tool separately which can add up quickly for any business!
The Pros of a comparison tool are that they were purpose build to help you compare documents and offer comparisons on more than just Word. They also offer other tools such as security and transaction assistance if your company required it.
3. Use Microsoft Word’s default ‘Compare’ feature
Because this is a problem so many of us face, Microsoft created a built in feature that allows you to compare two-word documents, ‘Compare’.
By opening a blank word document, then clicking through the Tool bar > Review > Compare > Compare. Word will place both documents side by side within Word and allow you to review any differences or changes.
Work picks up on all changes, highlights them and lets you know how many ‘differences’ there are between the documents.
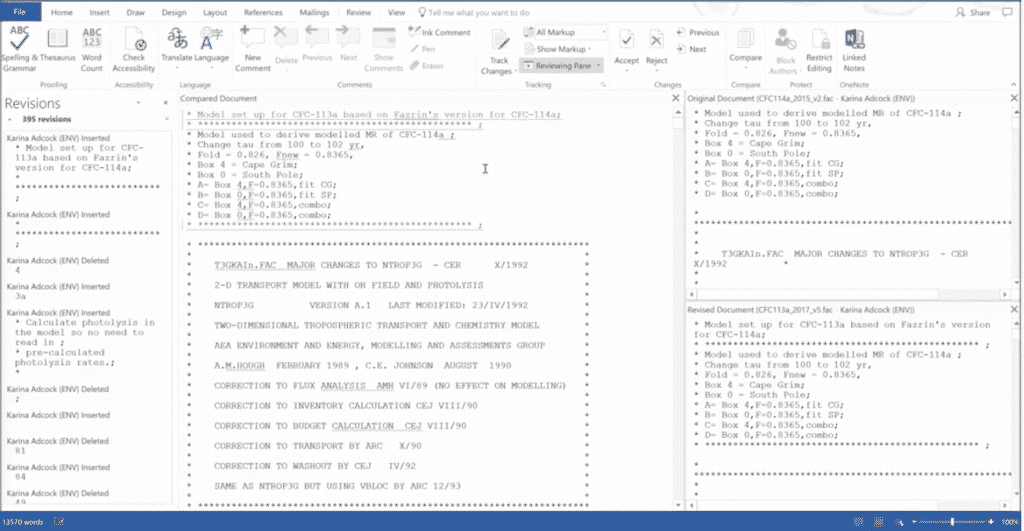
The challenging parts of using Word Compare is its clunky and doesn’t provide a very user-friendly experience. When you have the two documents open next to each other, Word shows this on a split screen and creates a Master document in the centre – there is a lot going on in front of you and changes aren’t easy to see and accept.
The positive is its free and already inbuilt into Microsoft Word.
4. Manually compare documents
Stripping it right back, you may opt to compare the documents manually. Open the two documents, place them side by side and review each line or sentence one at a time and manually highlight the differences or make changes.

The Cons of this approach is time and user error. Depending on how many changes were made between the two documents you are comparing this could take hours. Manually comparing the two documents without the assistance of a tool can also result in changes being missed or overlooked. This option works best when you know there are only a few changes and are very familiar with the document yourself.
The Pros of a manual comparison is its free!
To Sum it up…
There are some fantastic tools and options available to you when trying to diff two Microsoft Word Documents. What’s best for your team will come down to how often you are trying to compare documents, the size of your team and your budget.
Dedicated comparison tools such as Simul Docs offer a free document trial, so it’s worth trying at least once to help you make the right decision. With Microsoft Compare already built into your Microsoft Word and the old fashion manual comparison free, you can try 3 of the 4 options above at no cost.
Regardless of how often you find yourself needing to diff two Word Documents, this doesn’t have to be a time consuming, frustrating issue anymore. Take your time, try the WordCompare tool and give the free trial at Simul Docs a go, as a starting point.
Get Started For Free
See how Simul can help you with a 14 day free trial, and paid plans start at just $15 per month.