Simul Blog
How to add Horizontal Lines to a Microsoft Word Document
You’re looking for a way to create a break in your page, maybe you are starting a new topic, or you’re adding a new section. Adding a horizontal line to your document clearly shows a reader that a new section within your document has begun without having to create a page break leaving a whole heap of empty space.
There are two different types of horizontal lines you can add:
- Quick Autoformat Lines
- Microsoft Horizontal Lines
The autoformat option is most commonly used and many of us discovered it by mistake.
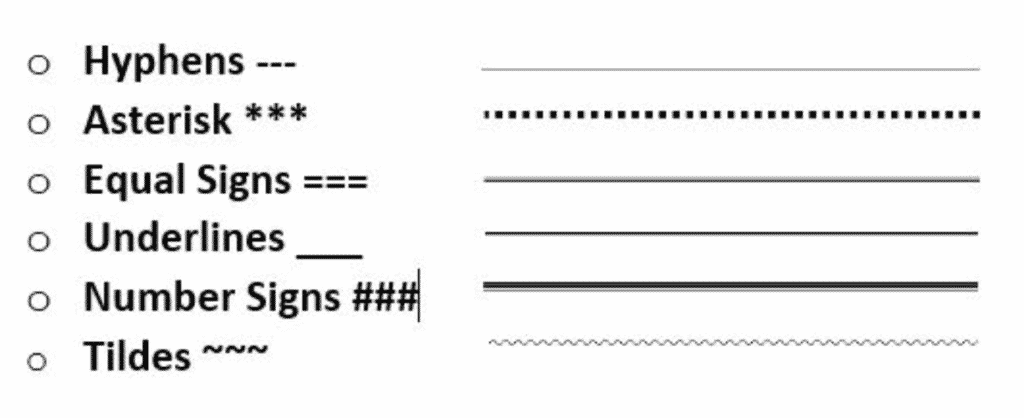
——————————————————————————————————————– That’s one there ^ by holding down the hyphen key you can create a quick and easy horizontal line in Word.
There are a few variations of the auto format line to choose from, just type 3 or more of any of these symbols and press Enter to create a horizontal line.
Adding a Microsoft horizontal line is just as easy, but does take a few more steps. In this post, we will show you how to insert a horizontal line into your Microsoft Word Document.
Adding Horizontal Lines to your Microsoft Word Document
- Open Word
- Place your cursor where you would like to insert a horizontal line
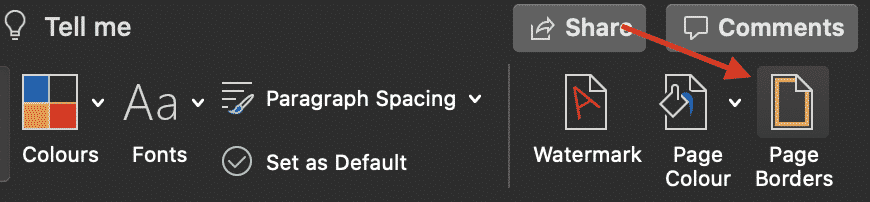
- Click the Design tab
- Click Page Borders
- In the Page Border pop-out window, click Horizontal Line
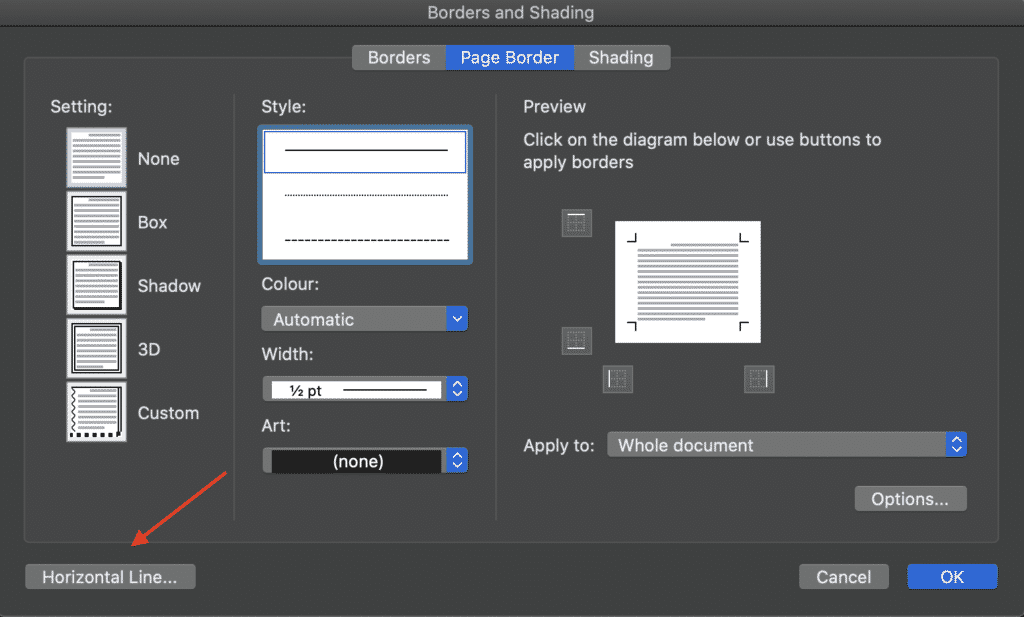
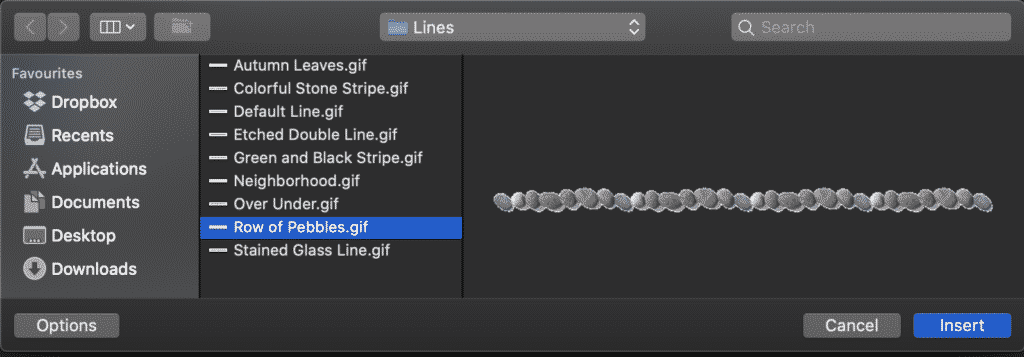
- Select the Style of Horizontal Line you would like to insert
- Press Insert
You have now successfully inserted a Horizontal line into your Microsoft Word Document.
If you would like to add multiple lines, simply follow the steps above.
Searching for a simpler way to work together on the same Word Document?
When it comes to collaborating together on a Microsoft Word Document with the aim of achieving a perfectly proofed final version. Why do we always end up with a shared drive full old versions and little clarity on which one is the most recent file?
You’re not along in thinking there has to be a simpler way to version control!
With so many of us facing the same frustrations, companies such as Simul Docs have jumped in to provide us with the simple version control solution we’ve been dreaming of.
Simul Docs is a purpose-built version control and collaboration tool for Microsoft Word documents, making it easy to work together on a word doc. Upload your draft word document into Simul and it will automatically give it a version number of 0.0.1.

Invite your colleagues to collaborate on the document with you, as soon as they open the document and start to make edits Simul will save the updated document as the next version and keep track of every edit, change and comment in the easy to navigate ‘Versions’ toolbar.

Now, not only are all of the old versions of your document tracked and sorted for you. Your shared drive isn’t a mess and you can easily refer back to an older version at any time with the click of a button.
When your team has finished making edits and you have accepted or declined any changes you can finalise the fine by pressing ‘Publish’. Simul will then allocate your final document a version number of 1.0.0 (rather than 0.0.1) and allows you to download it as a PDF, share via a sharable link, export to file services such as dropbox and more.

With a finalised document in hand and all of your old versions neatly stored away you can rest easy knowing you will never waste time sorting through your share drive on the hunt for a v6_updated_Bobsedits_FINAL_Finalv3 again.
Is that really the final version? Only Simul Docs knows.
Get Started For Free
See how Simul can help you with a 14 day free trial, and paid plans start at just $15 per month.